

I built a light meter to understand light
A build-to-learn story: a dead light meter at a camera swap, a darkroom class, and nine months later, an iPhone app for film photographers.

It started with a broken light meter.
I bought a Canon AE-1 at a camera swap, a beautiful old 35mm SLR and one of the best-selling cameras ever made. It was cheap because the meter inside it was dead. No problem, I figured. I'd just meter the scenes myself.
Then I tried, and found I had no idea how. I knew the vocabulary of exposure (aperture, shutter, ISO) the way you know the words to a song in a language you don't actually speak. Handed a real scene and a camera that wouldn't tell me what to do, I froze.
So last September I signed up for Darkroom I at Foothill College: 35mm black-and-white film, trays of chemistry under a safelight, and the slow fundamentals. Load the tank in total darkness. Develop a roll. Make a print. My first prints came back muddy, flat shadows with no snap to them, and it was obvious the mistake hadn't happened in the darkroom. It happened out in the field, the moment I metered the scene and guessed at the light. I've shipped products at Google for eighteen years. I figured understanding metering would take a weekend.
So I did what I always do when I want to understand something for real. I built it.
Build to learn
This whole newsletter is named after the idea, so I won't belabor it: the fastest way I know to actually understand a system is to try to reconstruct it. Not read about it. Not watch a video. Build the thing, badly, and let it fail in all the specific ways that show you where your mental model was wrong.
A light meter looked like the perfect target. I had a dead one in my hands, for one. It's small enough to finish, and deep enough to hurt. And it sits right on top of a stack I'd wanted an excuse to learn anyway: the iPhone camera pipeline, real-time GPU rendering with Metal, ARKit and the LiDAR sensor, and the strange world of color science. Every one of those is a rabbit hole. A meter gave me a reason to climb down all of them with a clear question driving each descent.
The deal I made with myself was simple. It had to be good enough that I'd carry it into the field instead of my real meter. If I'd reach for it on a shoot, I understood the problem. If I wouldn't, I was kidding myself.
It took about nine months. The first commit is dated September 17, the week class started. As I write this it's on TestFlight as GlassMeter, sixty-three commits and roughly eighteen thousand lines of Swift later. The reason I'm writing at all is that it finally cleared the bar. I reach for it first now, so it's time to let other people shoot with it.
The first version was wrong, and that was the point
I started in React Native, because that's where I was comfortable and I wanted to move fast. The app was called GroundGlass. It worked, sort of. It put a number on the screen.
It took about three weeks of fighting the camera through a bridge to realize the abstraction I'd chosen was the thing standing between me and the actual problem. A light meter lives or dies on what it can read off the sensor, frame by frame, in real time, and every layer between my code and that buffer was a place where the truth got rounded off. It had to be native Swift.
The switch happened the week Google Antigravity came out last November. I pointed it at the React Native project and asked it to port the whole thing to Swift. It did it in one shot: the entire app rebuilt natively in a single pass. That one made me sit back in my chair.
The rewrite was also the first real lesson of the project, and it had nothing to do with photography. It was about how often the tool you pick to go faster is the tool quietly deciding what you're allowed to learn.
Build the thing, badly, and let it fail in all the specific ways that show you where your mental model was wrong.
Lesson one: your phone is lying to you on purpose
The iPhone camera is a phenomenal piece of engineering whose entire job is to make every photo look good without you thinking about it. Face detection, Smart HDR, shadow lifting, local tone mapping. It is constantly, aggressively second-guessing the light in front of it.
That is exactly what you do not want in a light meter. A meter has to tell you the cold truth about the scene, including when the truth is "this is going to be a hard exposure." Point a stock iPhone at a night sky and it cranks the ISO to the moon and reports a brightness that is physically a lie.
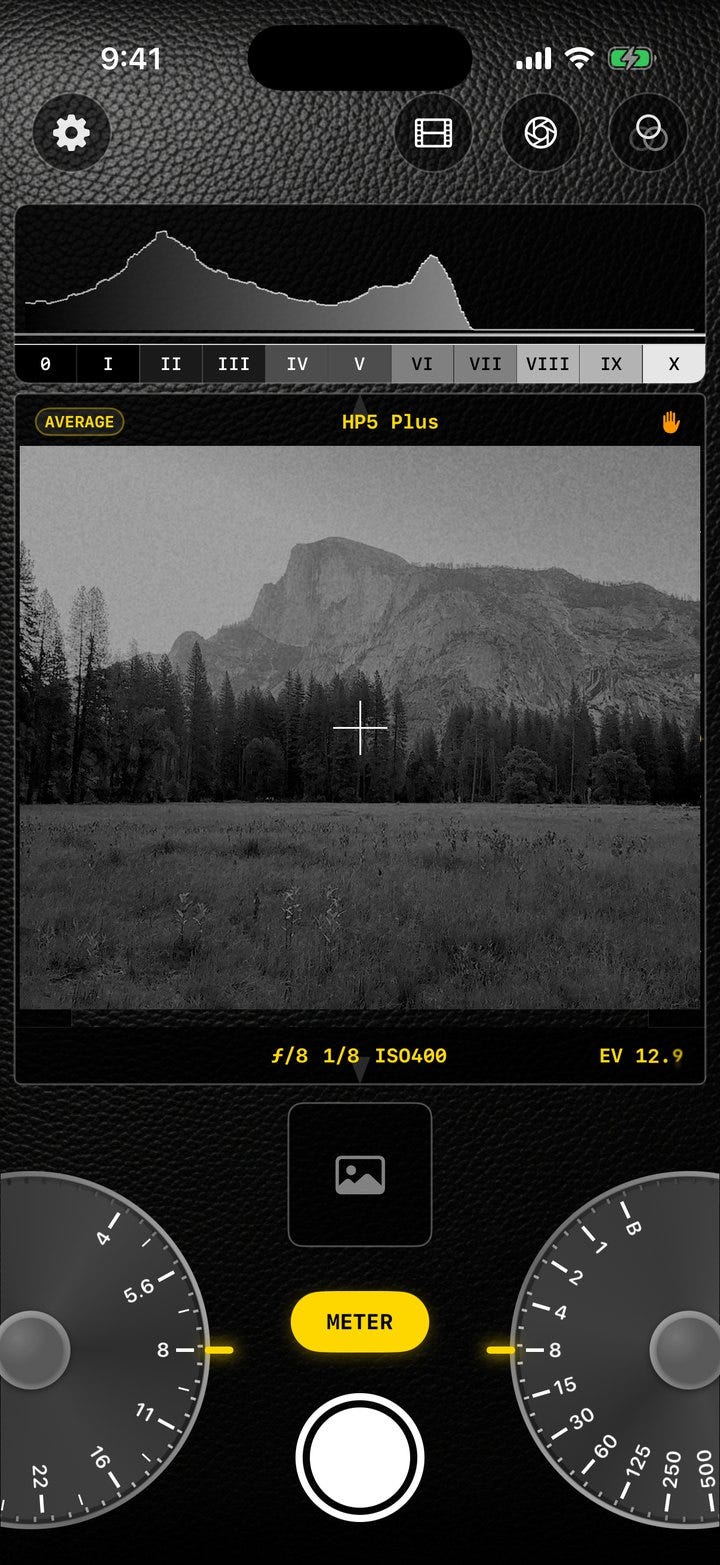
So the core of GlassMeter is a custom exposure loop that switches the camera into fully manual mode and runs my own metering at 5 Hz. Every 200 milliseconds it grabs the raw pixel buffer, measures the actual luminance, and nudges ISO and shutter to pin the scene to middle gray, the same 18% value photographers have calibrated against for a century. From those hardware settings plus the residual error, it computes a scene EV that holds still instead of jumping around.
A detail that ate an entire evening: the iPhone sensor is mounted in landscape even when you're holding the phone in portrait, so every tap on the screen has to be rotated into sensor coordinates before you can sample the right pixels. Tap a shadow in the bottom-left of the finder and, without the transform, you'd be metering something off the side of the frame. Obvious in hindsight. Not obvious at 11pm.
There was a subtler call underneath all of it, too. When you average a whole scene, do you average the brightness values directly, or in stops? GlassMeter averages in log space (a geometric mean), so a bright window in the corner of a room doesn't drag the entire reading toward the highlights the way a naive average would. It meters the way your eye weighs a scene, not the way a spreadsheet would.
Getting that loop to hold still without oscillating came down to deadbands and gain, the same feedback-control tricks I'd reached for before in other corners of my work. What was new was what it taught me about the darkroom idea that a good meter "settles." I'd been treating that as poetry. It's a feedback loop.
Lesson two: middle gray is 0.18, except when it's 0.46
This is the bug I'm most fond of, because it's where the photography and the code turned out to be the same fact wearing two costumes.
I wanted the finder to show you the photograph, your chosen film and aperture and shutter, not just a number. So after metering, the image flows through a film simulation: a tone curve, color shifts, grain, the works. And it came out crushed and muddy, shadows everywhere.
Middle gray, in the linear light the math operates in, is 0.18. But the film color tables I was feeding it expected gamma-encoded sRGB, where middle gray sits around 0.46. I was handing the film stage a 0.18 and it was reading that as "deep shadow," so every midtone in every scene got shoved toward black.
The fix is one gamma-correction step in the right place. The reason I understood the fix is that this is the same 0.18 Josh Smith, who teaches my darkroom class, had me metering off a gray card to set exposure and calibrate the camera. The number that means "the middle of everything" is the same number whether you're standing under a safelight or staring at a Metal shader. Eighteen percent. I will never forget where middle gray lives, because I spent a Saturday debugging it in two places at once.
Lesson three: film has opinions, and they're written down
The part that ate the most time, and gave back the most, was making the film simulations honest.
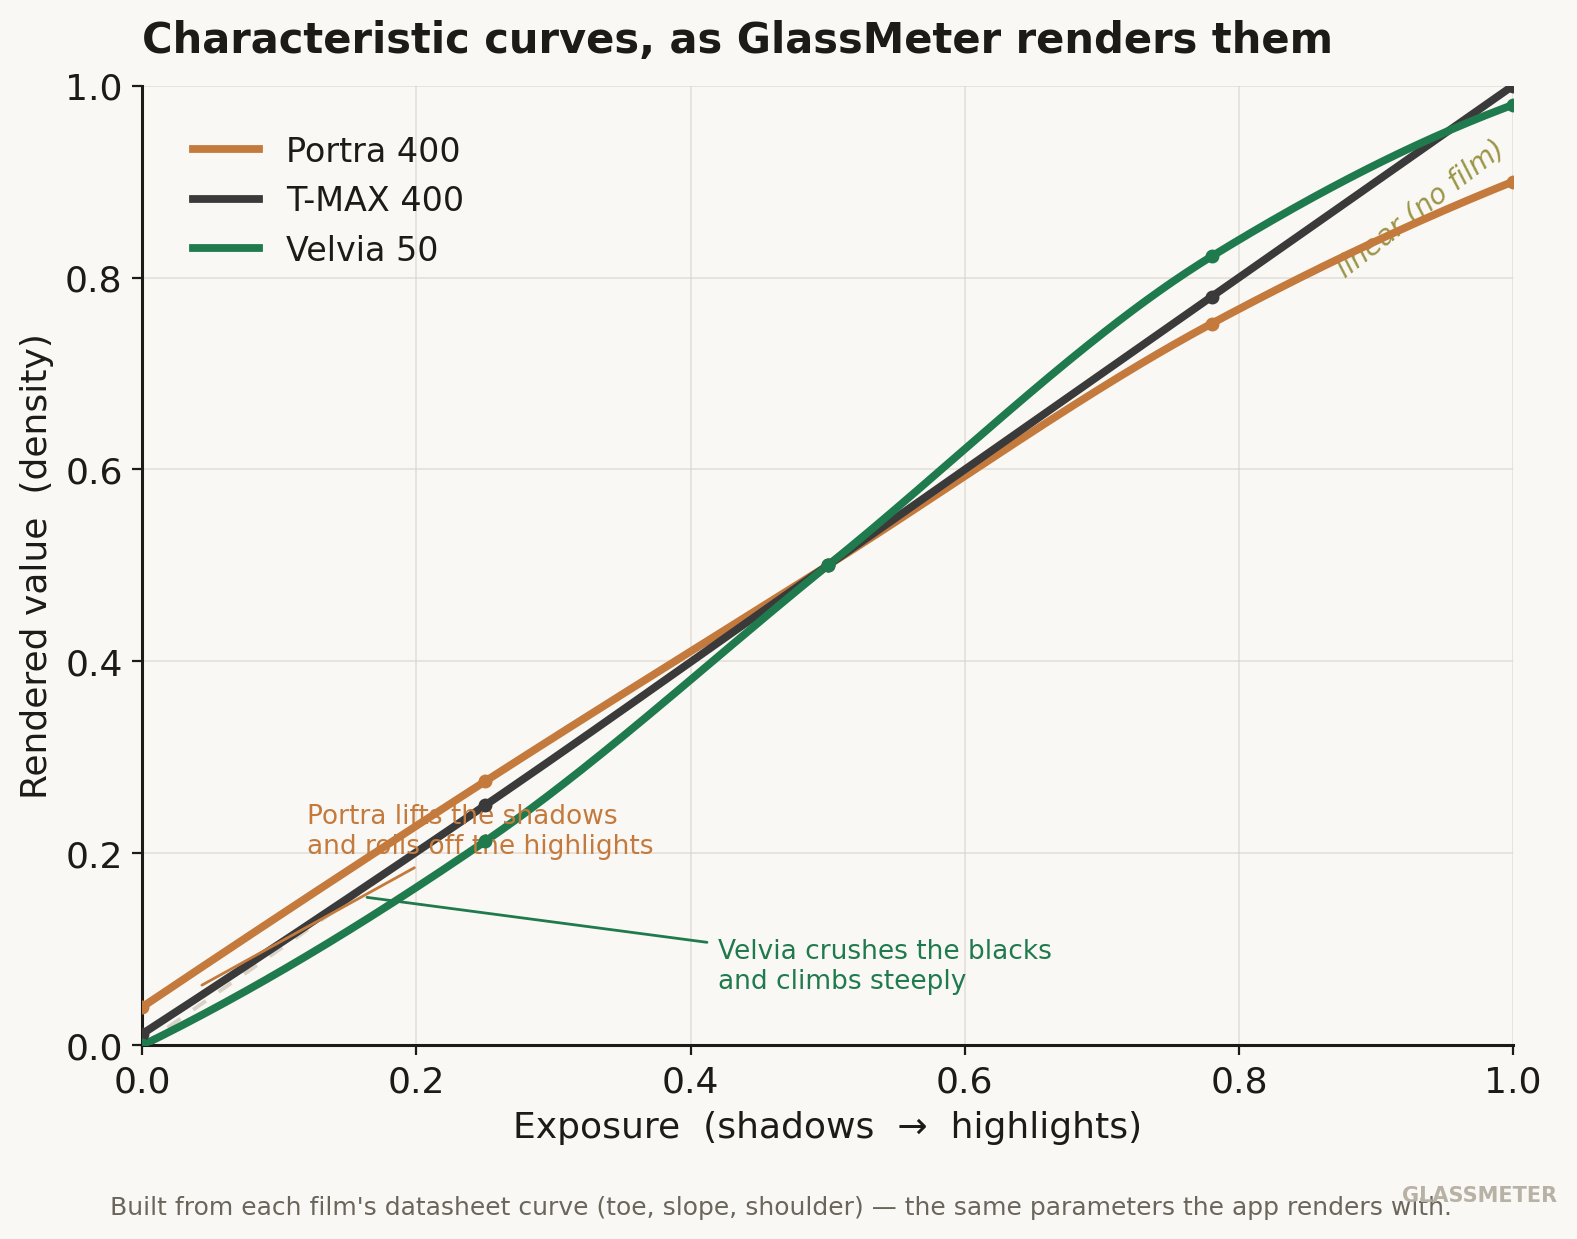
It's easy to fake a film look. Slap on a preset, warm it up, add grain, ship it. That's not what I wanted. I wanted Tri-X to behave like Tri-X. So I went to the source: the actual datasheets that Kodak, Ilford, and Fuji publish for every stock, with their characteristic curves (the H&D curves that plot how density responds to exposure), their reciprocity tables, their filter factors.
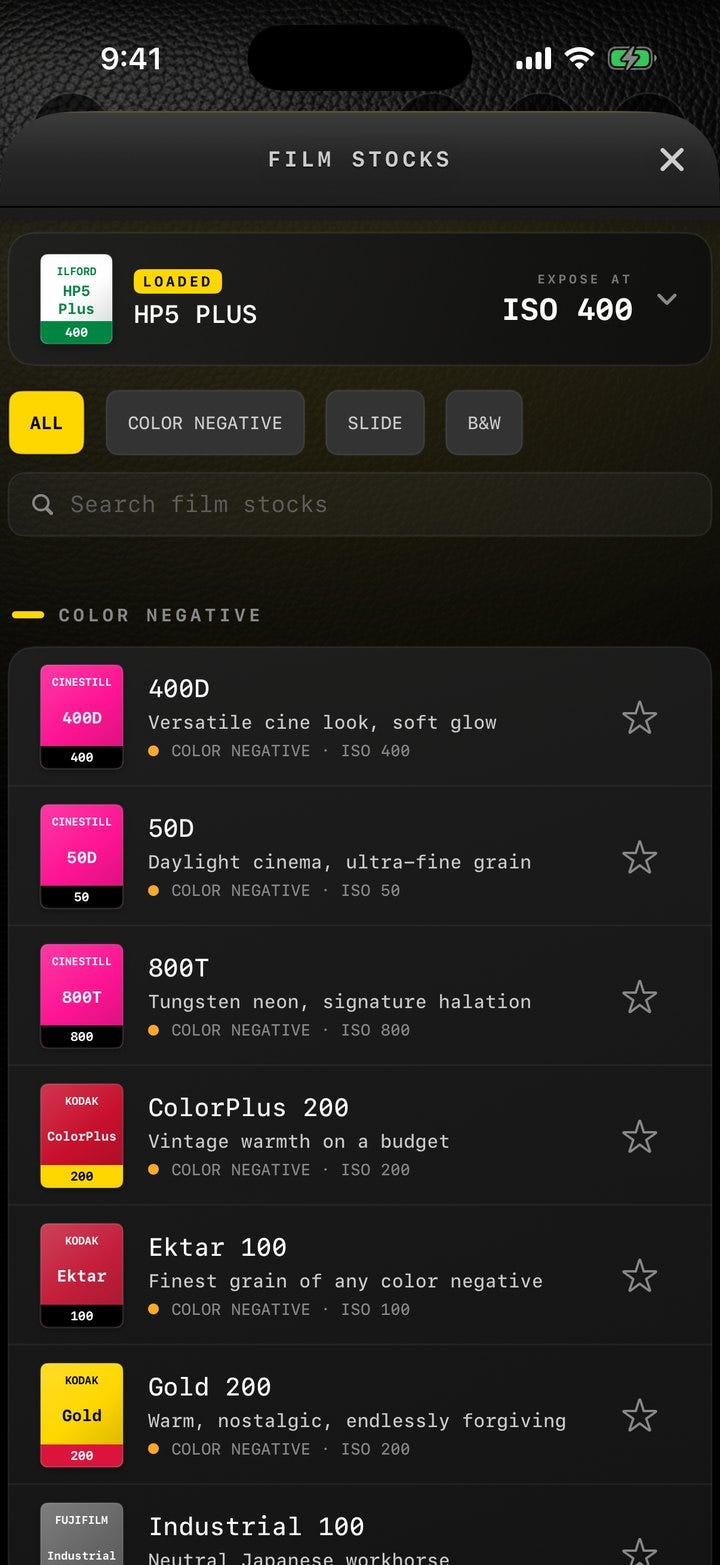
Each film in GlassMeter is built from its real published curve: Portra's long, gentle shoulder holding the highlights, T-MAX running nearly straight, slide film falling off a cliff in the shadows. Push HP5 to 3200 and the contrast steepens and the grain compounds the way a real push does, because the curve is doing real work, not a slider pretending to.
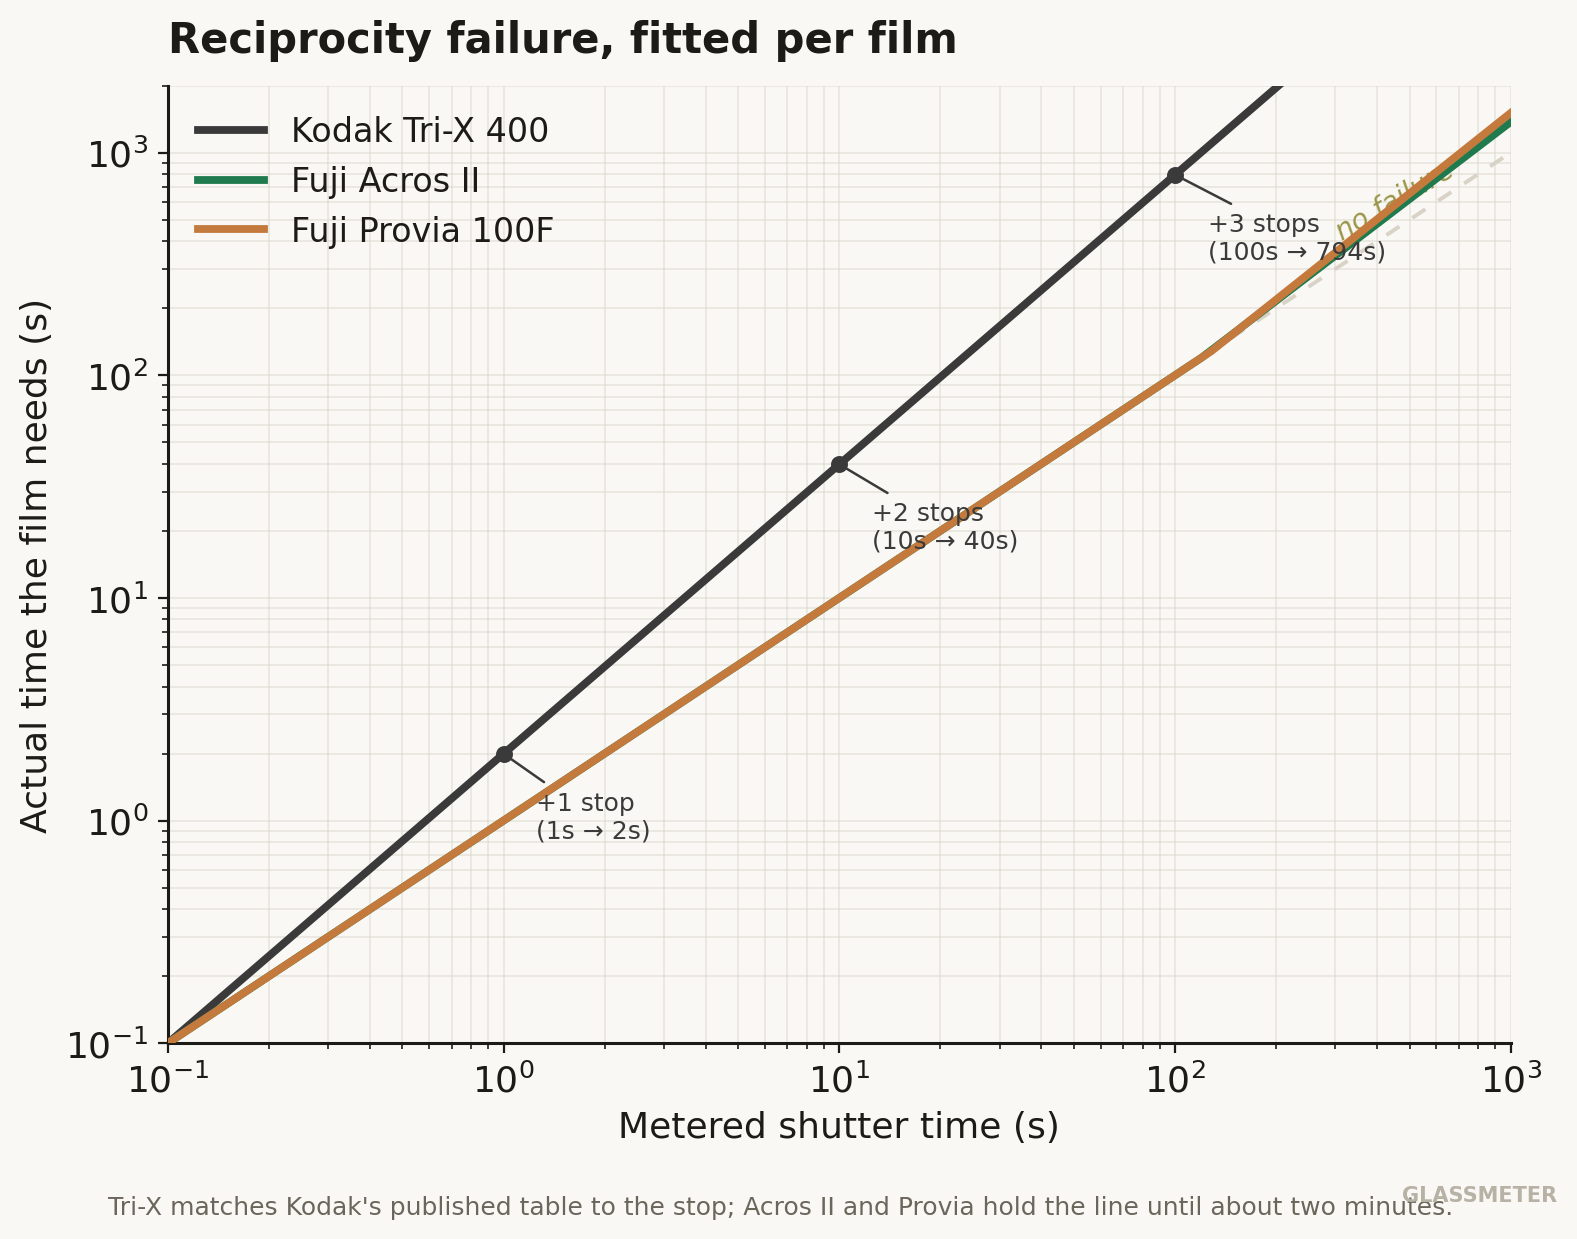
The reciprocity math is my favorite example of the datasheets paying off. Film loses sensitivity during long exposures, an effect called reciprocity failure), and every stock fails differently. I fitted a generalized version of the Schwarzschild law to each film's published correction table. The payoff: GlassMeter's Tri-X now matches Kodak's printed table to the stop, one extra stop at 1 second, two at ten, three at a hundred, while Acros II and Provia correctly don't start failing until you're two minutes into an exposure. The first time I watched the app add exactly the compensation the datasheet calls for, on a long exposure I was about to shoot, something clicked that no amount of reading had managed.
Then there was the bug I'll never live down. A batch of color films were rendering in full psychedelic Technicolor, skies going magenta and skin going green. The cause was two errors stacked on top of each other: I was reading the film's color table with the bytes in the wrong order and the color channels in the wrong order. The gray diagonal of the table happened to survive both mistakes, which is why grays looked fine and only colors scrambled, which is why it took me forever to find. The lesson there is older than photography. When the simple case works and the complex case explodes, suspect your assumptions about the data before you suspect your logic.
The number that means "the middle of everything" is the same whether you're standing under a safelight or staring at a Metal shader.
The decision that made it mine
Partway through, I'd gotten some of the film looks by decoding third-party color profiles. They worked. But they weren't mine, and shipping them as if they were didn't feel right.
So in June I deleted all of them and rebuilt every remaining film look from scratch, authored from the documented character of each stock rather than copied from someone else's profile. There's even a test that fails the build if any third-party profile sneaks back into the bundle. It cost me a week, and the app looks marginally different than it did. But every film look that ships is now original work, traceable to a published datasheet, and I can stand behind all of it.
That wasn't a coding decision or a legal decision. It was the instinct the darkroom drills into you: you own the print. Every choice in it is yours, on purpose, and you should be able to say why. Judy Walgren, who runs the photography department and has spent a career on the ethics of images, has a way of making that feel non-negotiable.
The class kept writing the roadmap
The course sequence turned out to be a curriculum for the app, too. Darkroom I was 35mm and the fundamentals. Darkroom II moved up to 120 roll film and medium format, and brought the Zone System, push processing, and contrast filters with it. Each idea showed up in Josh's class and then, a week or two later, in the app. I never had to write a feature list. The syllabus was the feature list.
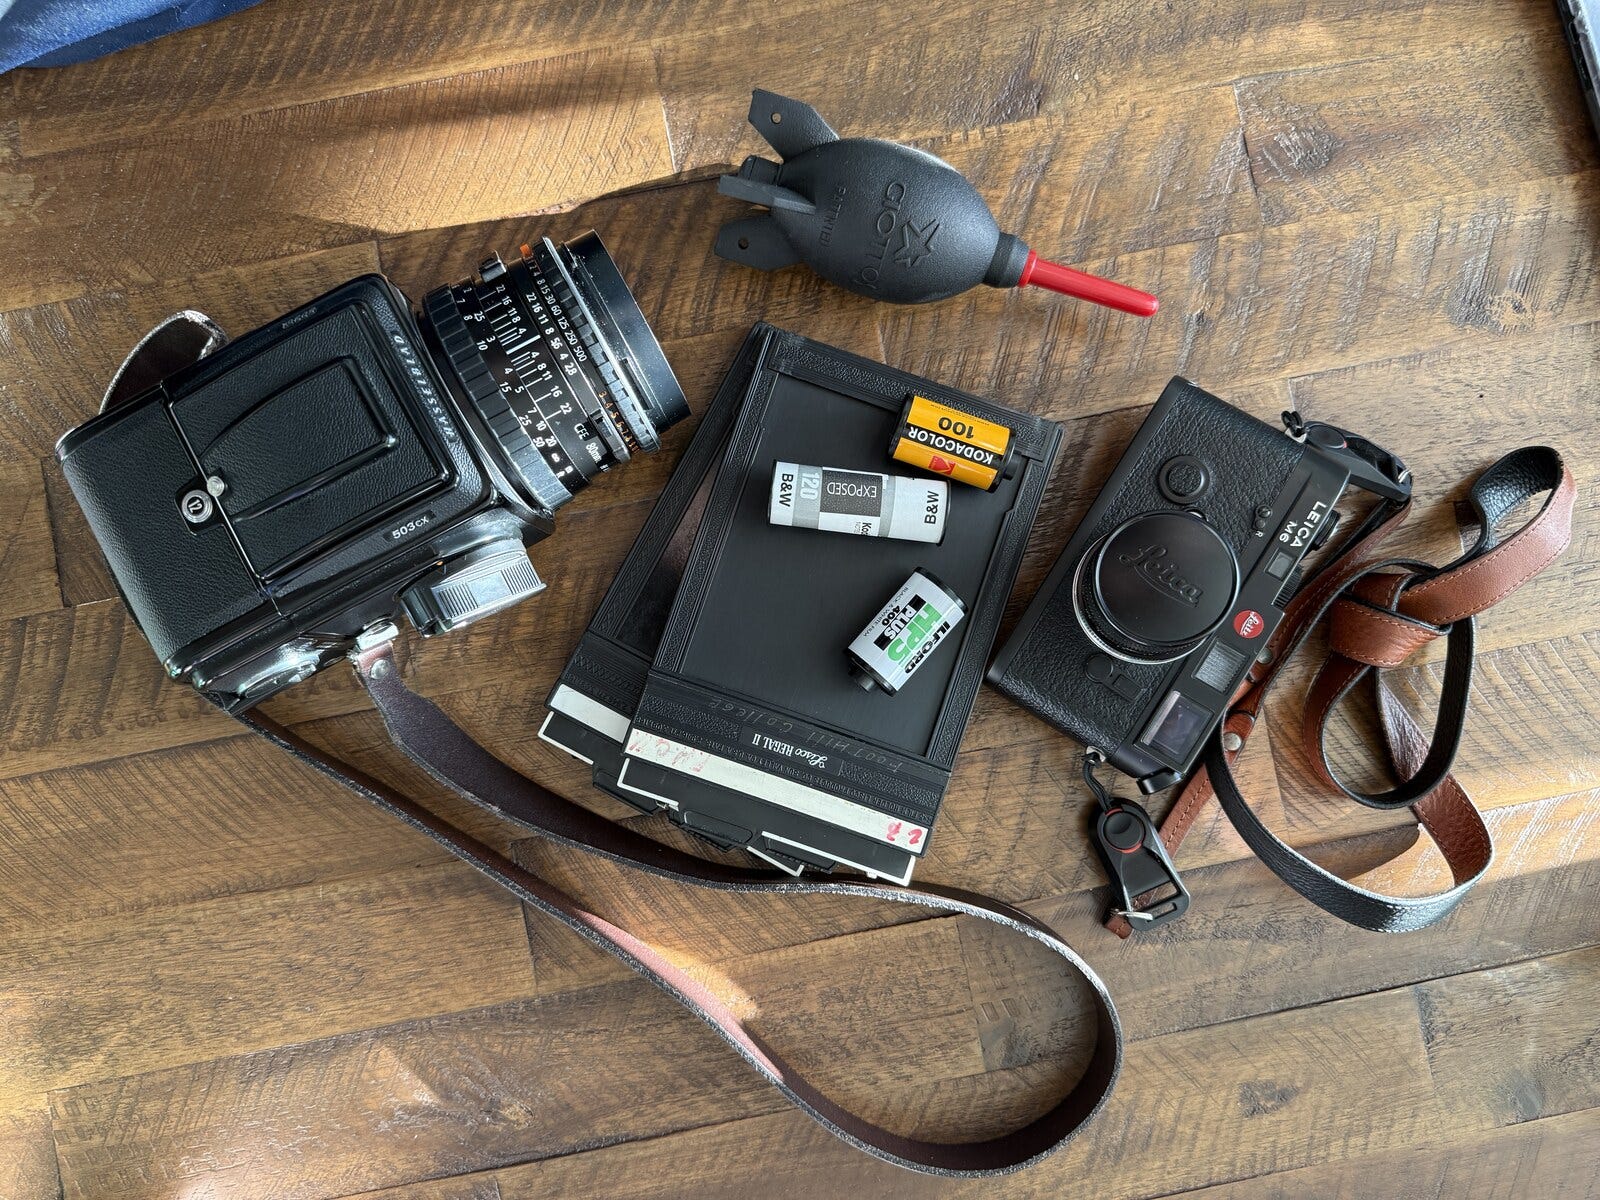
Medium format is where GlassMeter found its soul, and it's the format I built the app for. By then I'd bought a Hasselblad 503CX, a 6×6 camera that, like the classic V-system bodies, has no meter at all. You compose on a ground-glass screen in the waist-level finder, you get twelve frames to a roll of 120, and you bring your own meter or you don't shoot. That's the camera GlassMeter is built to think like, down to the square-frame discipline, the Zeiss-style glass, and the Hasselblad-flavored metadata it writes into every file. I'd named the first prototype GroundGlass, after that focusing screen, before I owned the camera that made the name make sense.
So the Zone System workflow is the real one. Spot-meter a shadow and pin it, spot-meter a highlight and pin it, and the meter places your exposure between them in log space, the shadow-and-highlight placement Adams taught and my instructor drills. As far as I can tell, no other phone meter does it properly. You can pin up to five readings and watch the app average them, exactly the way you'd reason through a tricky scene by hand.
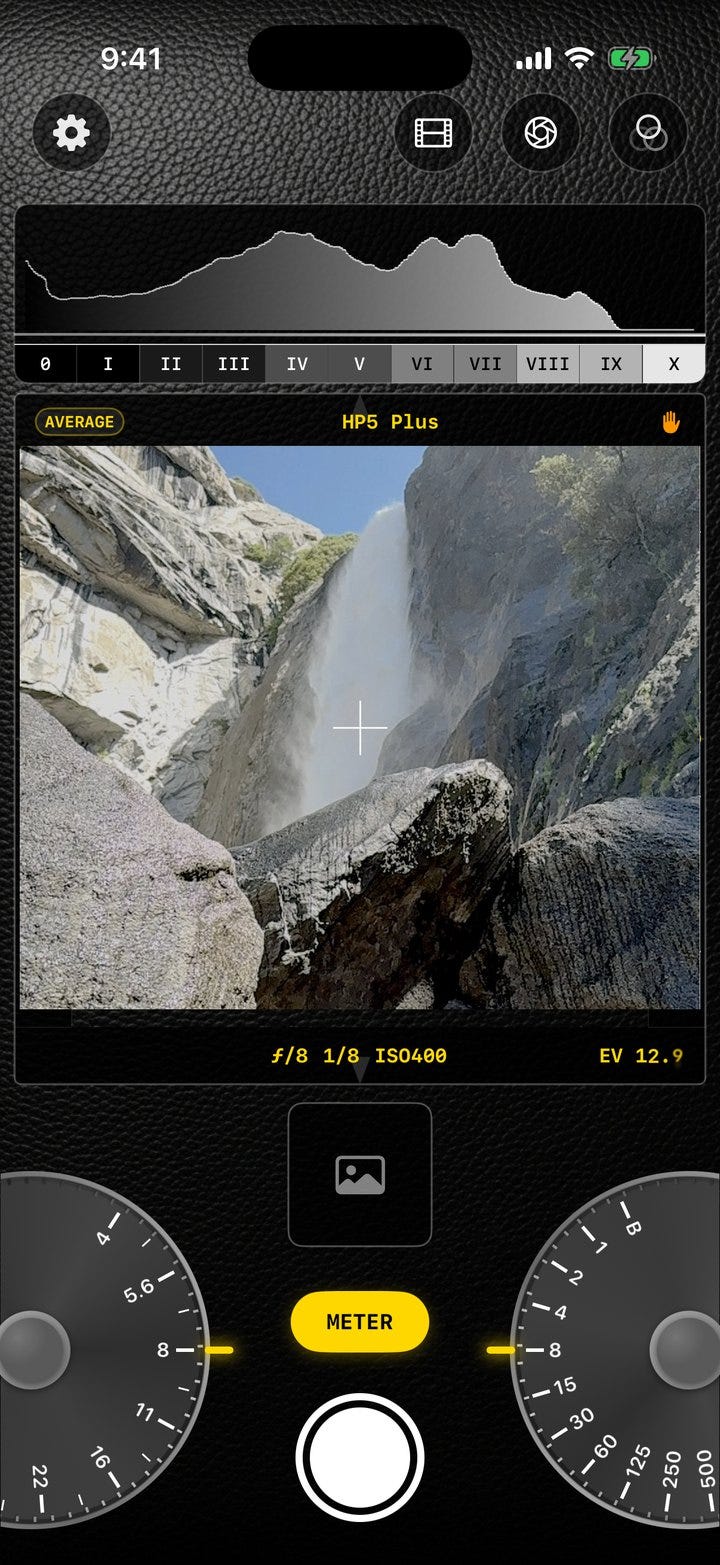
The app also shows you the scene's dynamic range live. Two markers track the darkest and brightest regions in the frame and report the spread in stops between them, and when the sensor clips, the meter says so plainly instead of pretending the spread is smaller than it is. That single readout has talked me out of more than one exposure I would have blown.
I've since moved up again. I'm in Darkroom III now, shooting 4×5 large format, one sheet of film at a time under a dark cloth. It's the most deliberate photography there is, and the meter comes with me. But its heart is still the medium-format roll it was built for.
A meter that knows where things are
A handheld meter has never been able to do this next part, because a chunk of glass in a leather case doesn't know how far away anything is.
GlassMeter uses the phone's LiDAR scanner as a rangefinder. Up close, LiDAR reads true distance to whatever you've metered. Past its range, your focus distance takes over on the same scale, and the app draws the near and far limits of your depth of field for the aperture you've dialed and the lens you've loaded. You can see, before the shot, exactly how much of the scene will be sharp.
This is the feature I'd never have guessed I'd build when I started. It exists because once I understood metering well enough to finish that part, the next question (how much of this will be in focus?) was sitting right there, and the sensor to answer it was already in my pocket.
The glass has opinions, too
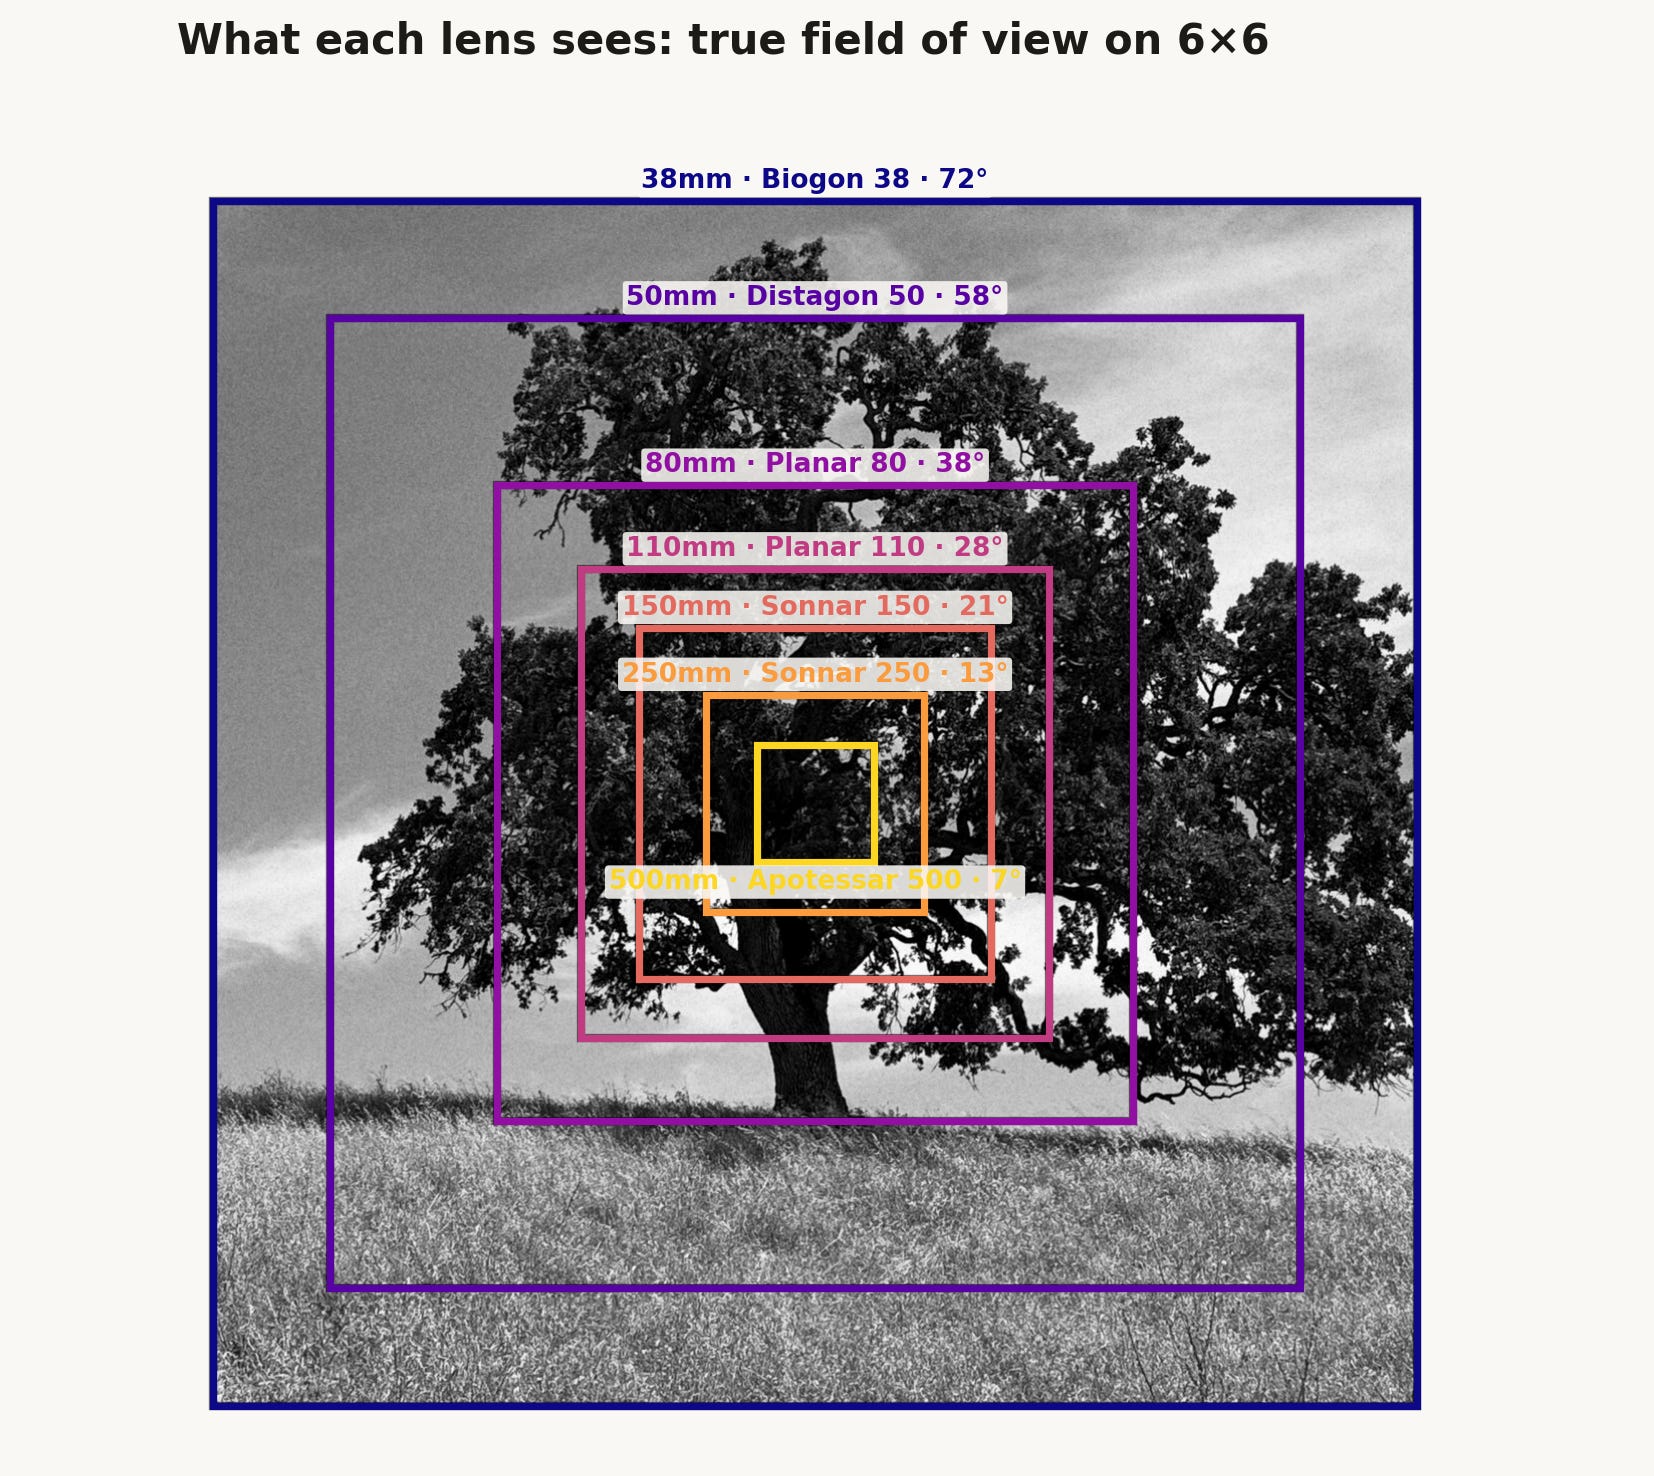
The same datasheet honesty that went into the films went into the lenses. GlassMeter carries fifteen Zeiss V-system lenses, from the 30mm F-Distagon fisheye to the 500 Tele-Apotessar, and each one is built from its real published numbers: focal length, aperture range, true angle of view, minimum focus distance, filter thread, even which shutter it carries.
The most useful part is the simplest. Load a lens and the finder reframes to exactly what that lens sees. Put on the 250 Sonnar and the frame snaps to its real 13-degree field, and the meter reads only inside that crop. You end up metering the photograph you're actually going to take, not the wider scene your phone happens to be pointed at.
From there the small stuff piles up the way it does on real glass. Each lens vignettes at the edges wide open and cleans up as you stop down, modeled in linear light so the falloff behaves. Each one loses a little light passing through, so a fast lens reads a hair slower than its f-number promises, and that loss is folded into the exposure. And each has its own bloom: the Planar FE 2/110 is the system's glow lens, with a visible halo wide open at f/2, while the 100 Planar is corrected so well it barely blooms at all. That character then gets multiplied by the film's own halation, so an 800T frame through the 110 glows very differently than Acros through the 100.
One honest caveat, since I'm keeping a list of those: Zeiss never published per-lens vignetting curves for the V system, so that single number is a heuristic from focal length and speed rather than a measured falloff. Everything else traces to a data sheet.
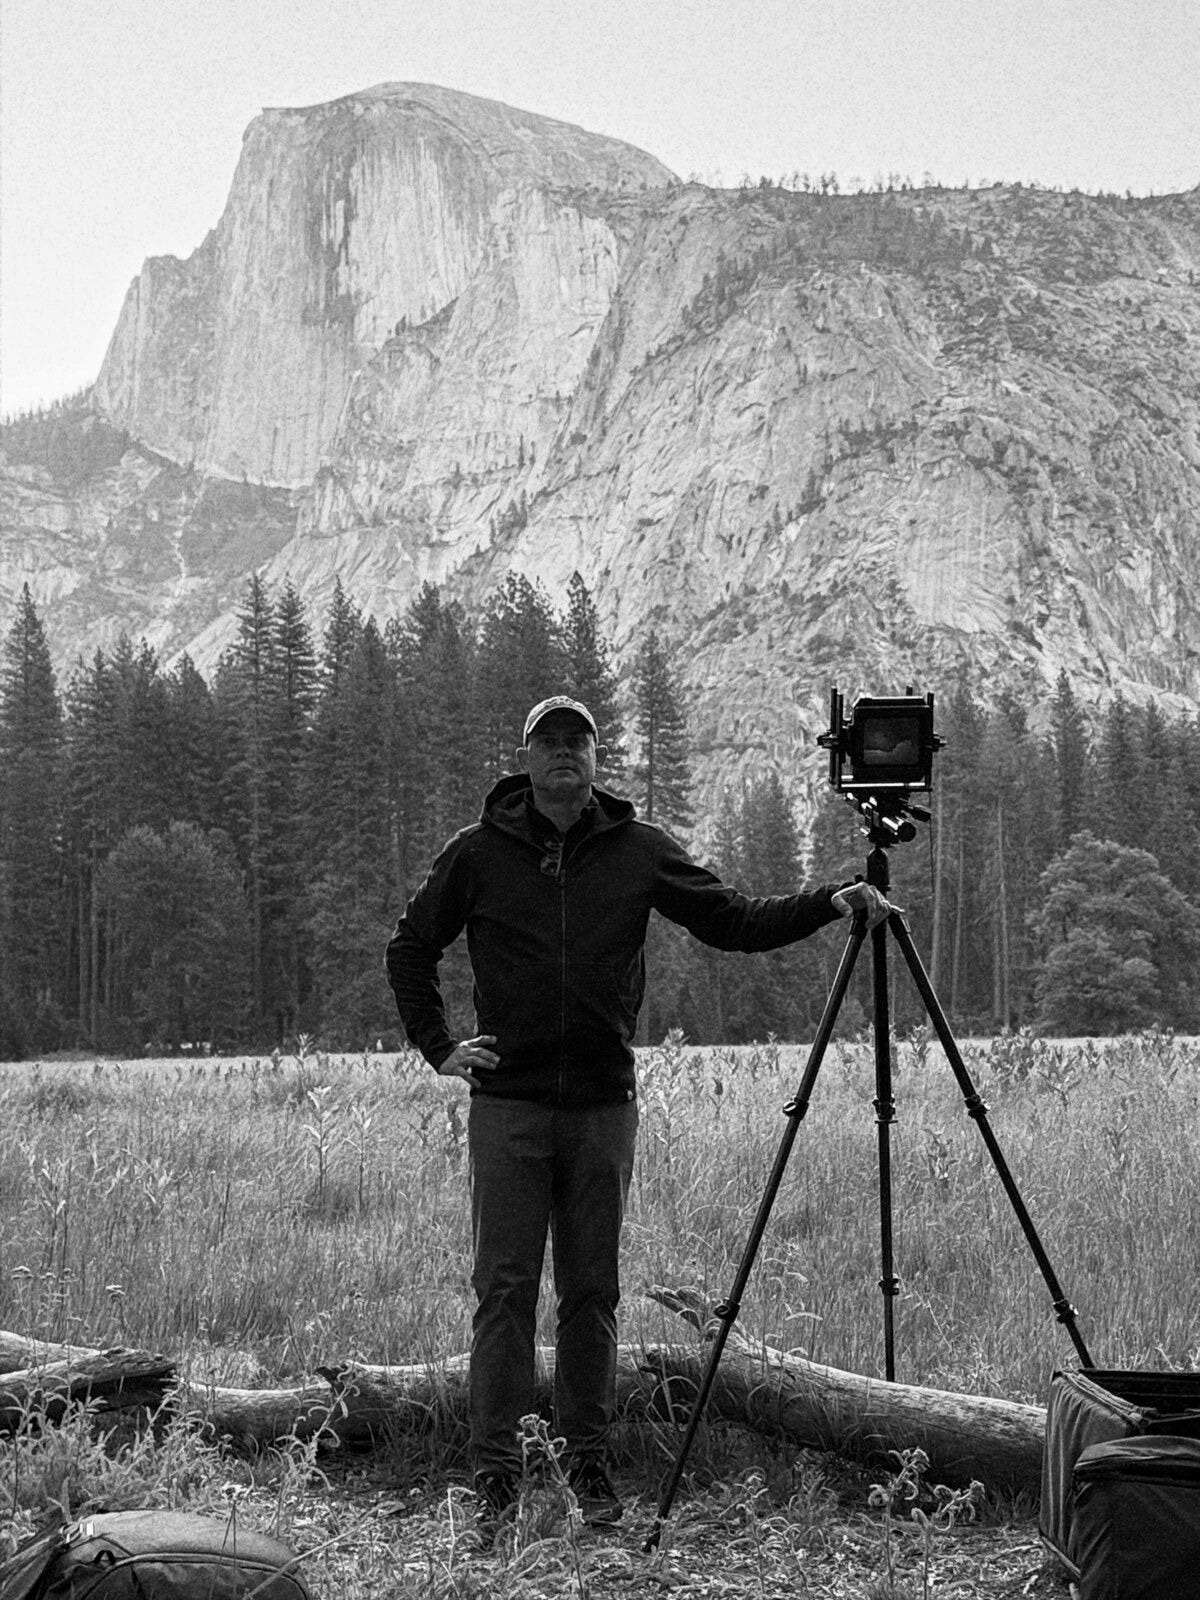
One frame, the long way
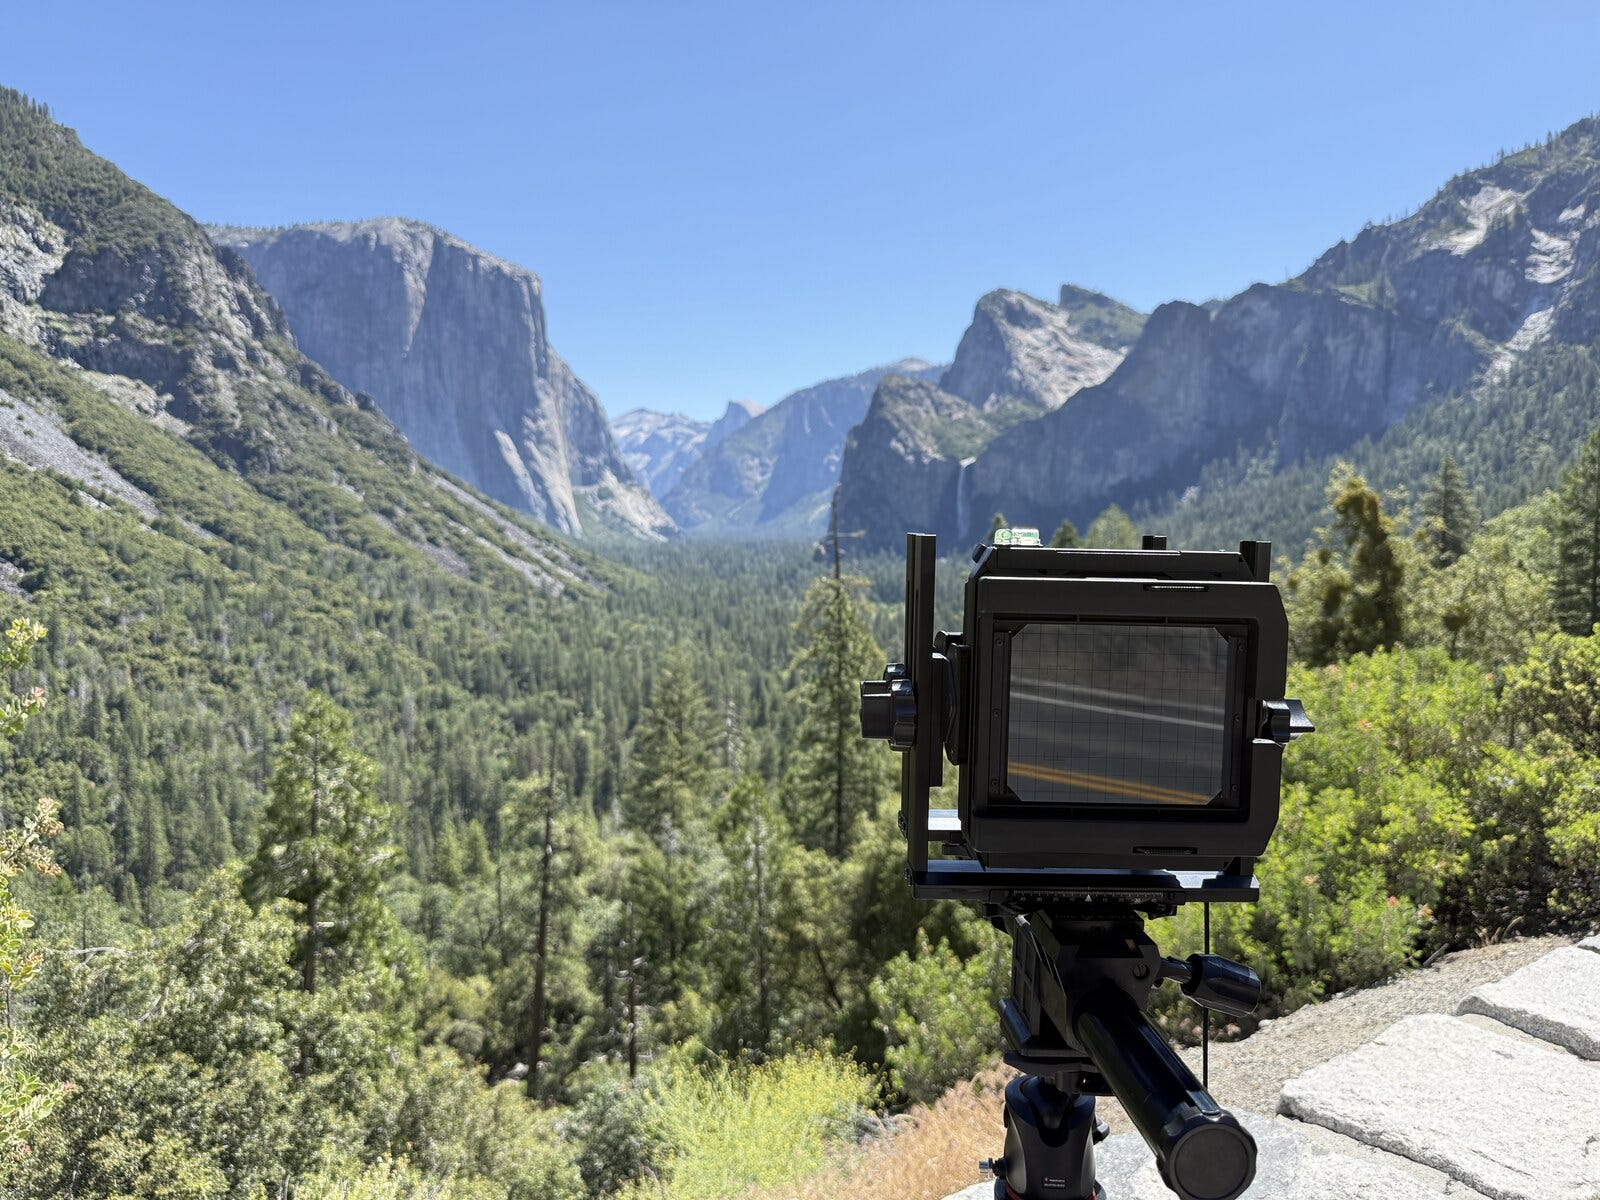
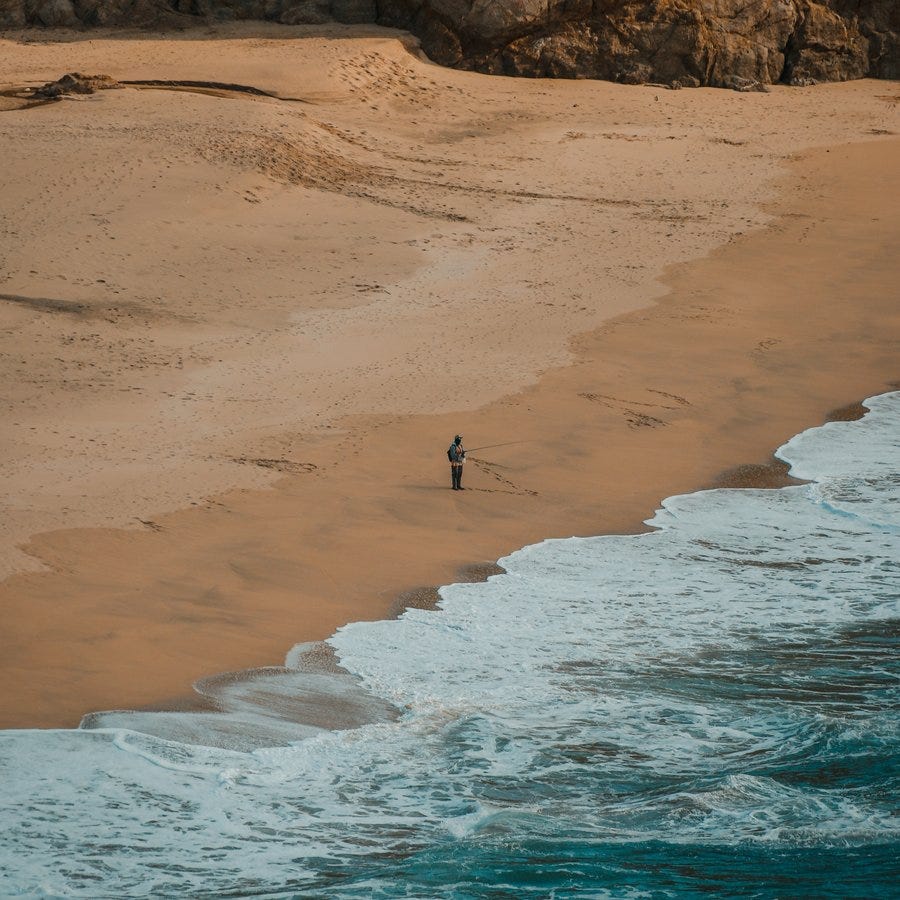
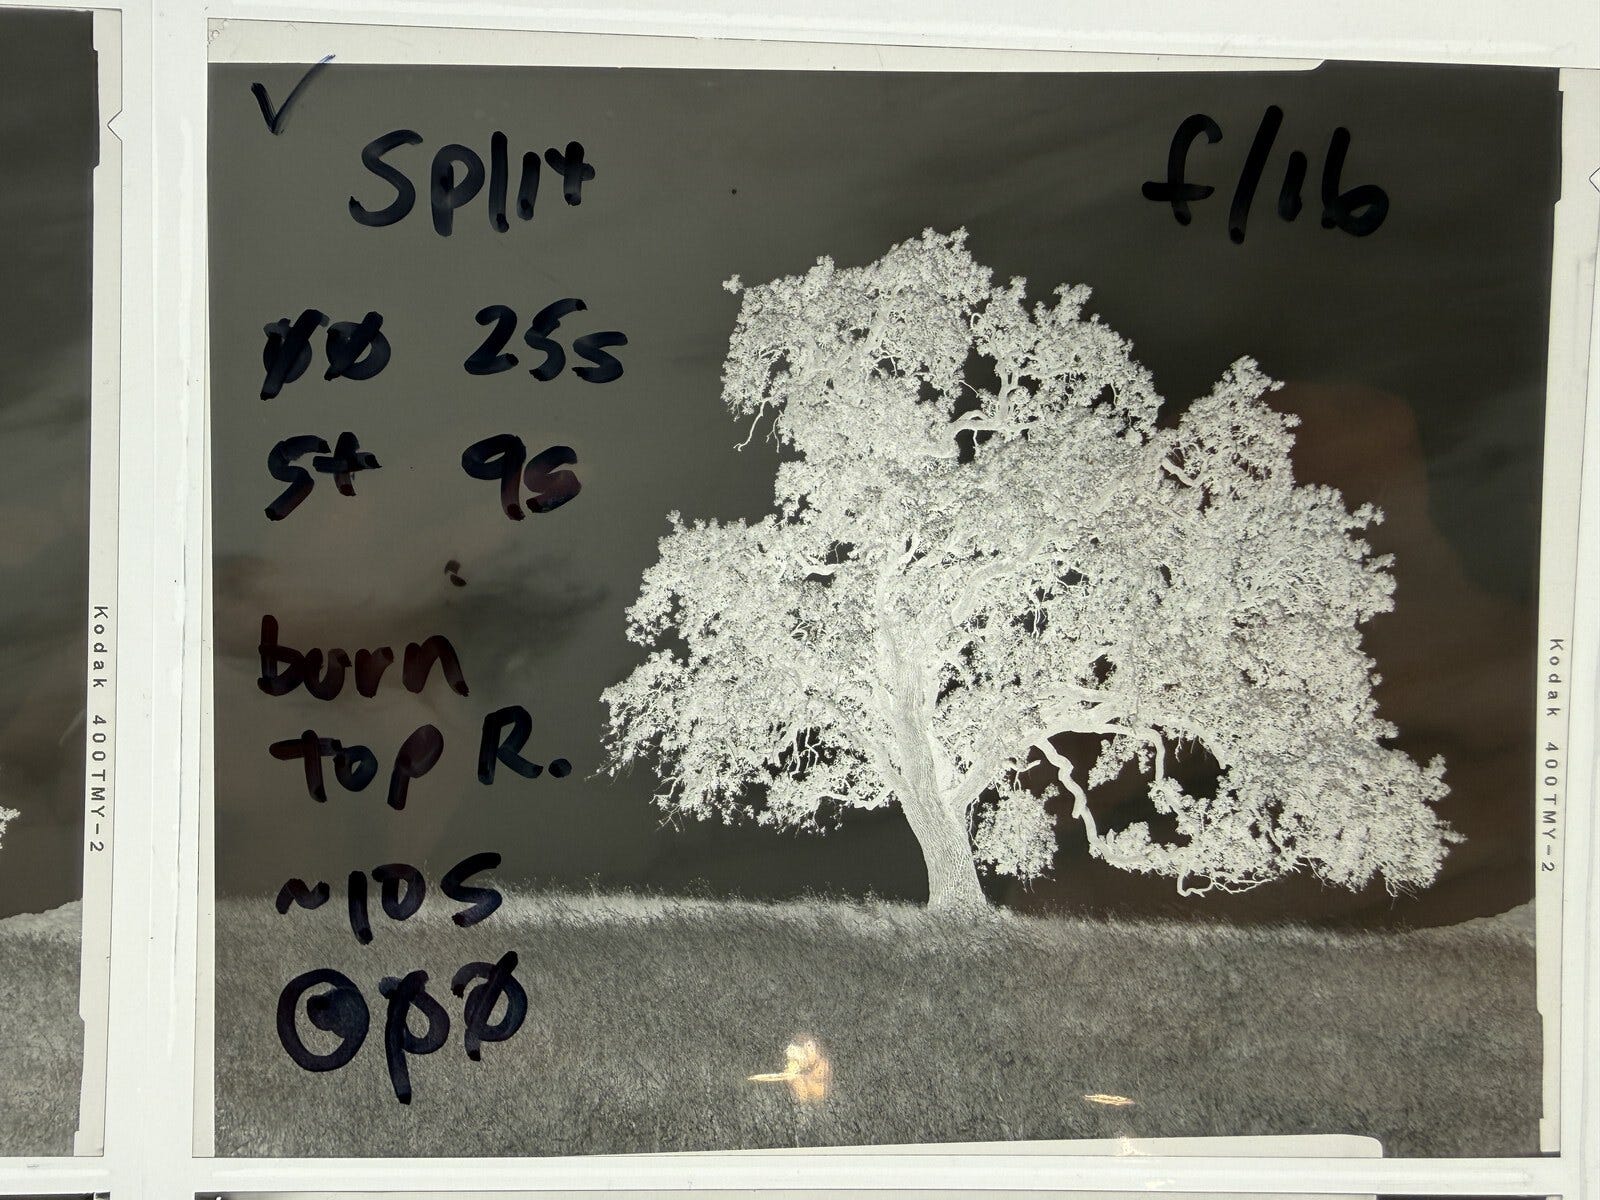
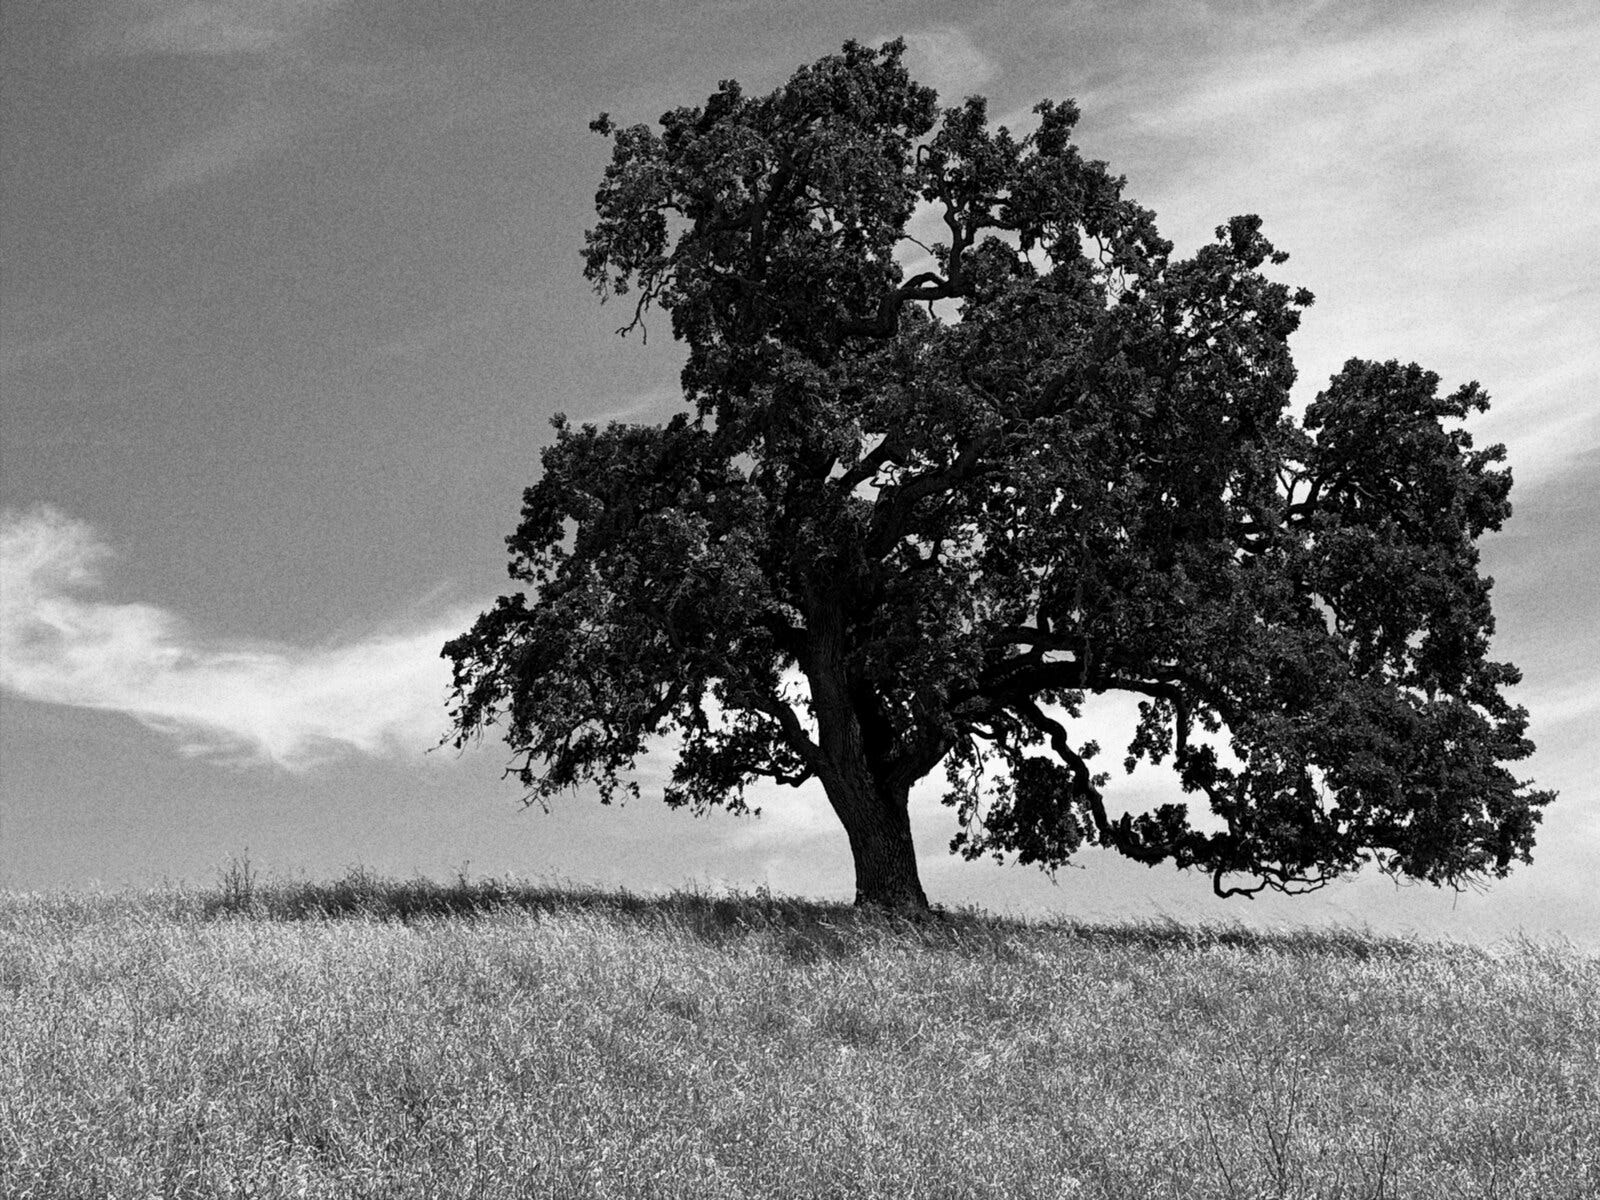
Here is what all of that machinery actually feels like in the field, on a frame you've already seen in this piece: the valley oak.
I set the camera on the tripod and point the phone at the scene. I spot-meter the deep shadow under the canopy and pin it, then the bright dry grass in the sun and pin that too. Both readings land on the zone ruler with the spread between them, and on a high-contrast afternoon the app tells me plainly that the range is wider than the film will hold cleanly. So I make the call every film photographer makes: I place the shadow on Zone III, dark but still holding texture, and the meter sets the exposure to put it exactly there. Now I know where the highlights will fall, and how much of the sky will blow, before I have spent a single sheet.
I want the trunk crisp and the far ridge soft, so I read the depth-of-field limits the rangefinder draws for the aperture and the lens I've loaded, and stop down until the near edge of sharpness reaches the grass. The light is going, and the exposure runs long, past a second, so the app folds in the film's reciprocity correction and counts the bulb exposure down in my hand with haptic taps. I trip the shutter, hold it open until the count ends, and that is the frame.
The notebook that keeps itself
Film never recorded its own settings. You scribbled them in a notebook or you lost them forever, and most of us lost them. By the time you've developed the roll and you're hanging the negatives up to dry, you can't remember whether that frame was f/8 or f/11, or which filter was on the lens.
Every frame GlassMeter captures carries its full exposure record into the file's metadata: film, lens, aperture, shutter, ISO, push or pull, even the individual spot readings you pinned. The notebook I always meant to keep, kept automatically.
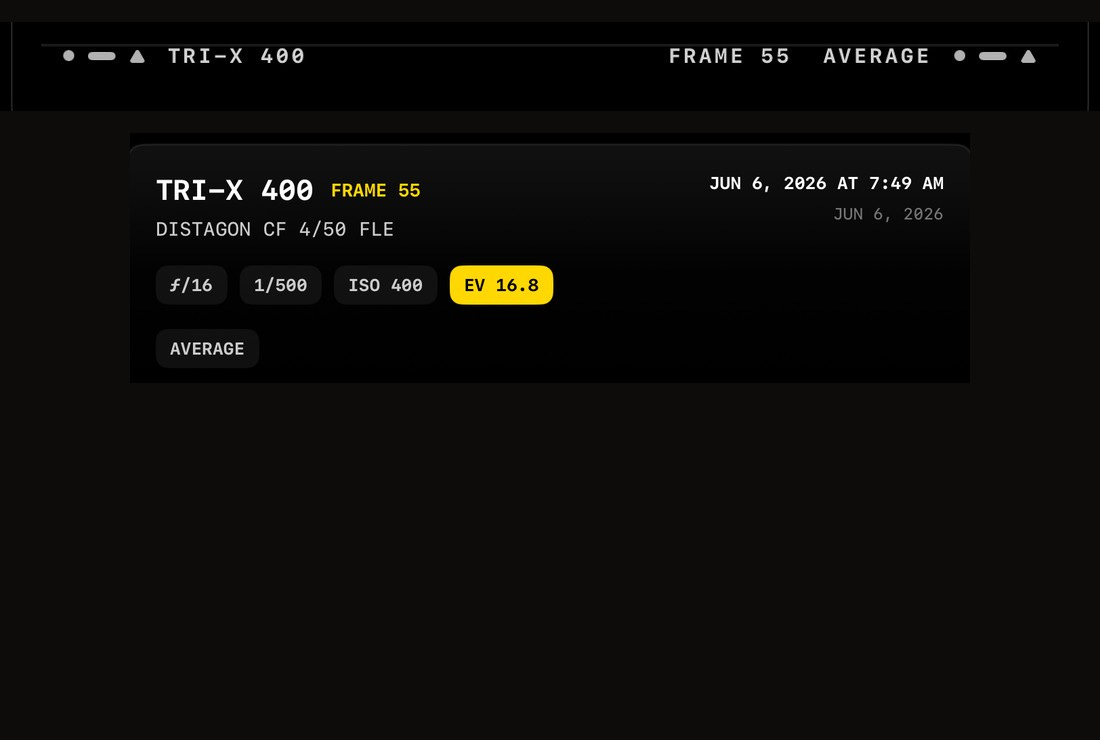
You can share a frame two ways: as the photo, or as a little contact-sheet cell with film-edge markings and your exposure data printed alongside it, the way a real proof sheet looks. It scratches the same itch as labeling your negatives, minus the part where you never actually do it.
The details that don't photograph well
Plenty of the nine months went into work that will never show up in a screenshot.
There's a bulb-mode timer that counts your long exposure down in your hand with haptic taps, the film's reciprocity correction already folded into the recommended time. That one is pure darkroom-class wish fulfillment.
The aperture and shutter dials have haptic detents you can feel, and you can lock one to shoot aperture-priority or shutter-priority, the way the dials on a real body work. Press the meter button and the unlocked dial solves itself.
The filters are honest, too. Yellow 8, Green 11, Orange 21, Red 25, each with Kodak's published Wratten factors and a spectrally-derived color response, so a red filter really does drive a blue sky toward near-black the way it does on real B&W film.
And then there's the unglamorous stuff that makes an app feel finished. The whole thing is localized into 34 languages. It sheds frame rate and effects when the phone gets hot, and pauses rendering entirely when a menu covers the finder, because your battery is part of the design. None of that is exciting to describe. All of it is the difference between a demo and a tool.
The stack, in the end
Nine months in, this is what the side quest actually taught me, beyond photography. Real-time GPU rendering in Metal, where the live finder and the final capture run the exact same 16-bit, wide-gamut image pipeline so that what you see really is what you get. ARKit and depth sensing. A pile of color science I'd never have learned from a tutorial, because I'd never have had a reason to care. And a fresh respect for how much deliberate engineering goes into the camera in your pocket pretending to be effortless.
I also made a decision I'm quietly proud of. GlassMeter collects nothing. No account, no analytics, no servers, no network calls of any kind. The App Store privacy label reads "Data Not Collected" because there is, truly, nothing to collect. The most interesting thing a light meter could ever phone home is nothing.
A few thanks
I didn't get here on my own. Josh Smith teaches the darkroom classes I've been taking at Foothill since last fall, and he's the reason I started shooting film seriously in the first place. He's a working photographer and a patient teacher, and he also teaches photography at Eastside College Prep in East Palo Alto. Judy Walgren runs Foothill's photography department; she's a Pulitzer Prize-winning photojournalist and a former director of photography at the San Francisco Chronicle, and her advice, on the pictures and on everything around them, has shaped how I think about all of this. Both of them have been generous with their time and their eye throughout this project, and patient with a software guy who kept turning up to class wanting to talk about exposure math. Thank you.
Where it's still wrong
I'd rather be straight about the limits, because a meter you trust blindly is worse than no meter.
It's a phone, not a dedicated spot meter. In bright sun the screen washes out, the battery drains under the rendering pipeline, and it slows itself down when it gets hot. For critical work I still sanity-check it against my handheld, and you should too.
Incident metering is an approximation. A real incident meter has a diffusing dome with known optics; the phone's front camera doesn't, so I model the diffusion instead of measuring it. It lands close, but it still wants a calibration pass against the real thing.
And some of the film numbers are educated guesses. Manufacturers only publish their reciprocity tables so far. Past a second or two, the color-negative corrections are extrapolated rather than measured, because Kodak and Fuji simply don't print them. I flag those in the app's engineering notes rather than pretend they're gospel.
None of that is false modesty. It's the list I'm hoping the beta helps me shorten.
The most interesting thing a light meter could ever phone home is nothing.
Why I'm sharing it now
I built this for me. For most of its life it was a tool with exactly one user, tuned to exactly one person's confusion about exposure. The bar I set was selfish: would I carry it into the field instead of my real meter? For a long stretch the answer was no, and that no was the to-do list.
Somewhere this spring the answer flipped. Now it's the first thing I reach for when I'm standing in front of a scene trying to decide where to put the shadows. That's the whole signal I was waiting for.
So it's on TestFlight, and you're invited. If you shoot film, or you've ever wanted to actually understand what a light meter is telling you instead of just trusting it, I'd love for you to break it and tell me where it's wrong. There's a feedback button right in the app. What I most want to hear: where the meter disagrees with your handheld, and which film looks feel off to people who have shot them for years. If the beta holds up, the App Store is the next stop.
You can join the beta at glass-works.ai.
And if there's a system you've been circling for a while, half-understanding it from the outside: pick the small, deep version of it and build the thing. Let it fail at you. You'll never read middle gray the same way again.