

Make your AI agent work while you sleep
A step-by-step guide anyone can follow to build rad shit with proactive AI agents

One of my readers sent me an email last week with the subject line “Building Semi-Rad Shit.”
He’d been inspired by something I wrote and stayed up late putting it to work. He trained Gemini to review solar site title insurance exceptions. Then he had it pull utility hosting capacity maps, find available parcels, and cross-reference them against where the grid has room. A list of viable solar development sites, ranked by proximity to power lines. In a few hours.
“Last time I did site identification a few years ago,” he wrote, “I pulled the map data off the utility website into a database, then matched it with parcel data from each county by hand... this time I got a solid list in only a few hours!”
Then, near the bottom of his email, he hit the wall.
“It’s a little annoying that I can’t just have it do things offline, and it can’t send me emails once it’s done the work periodically.”
Almost every builder I know hits this wall eventually. You do something impressive with AI, you see what’s possible, and then you realize: your AI only works when you’re there asking it questions. It goes to sleep the moment you close the tab.
This post is about how to take that next leap with AI.
The gap between an assistant and an agent
Most AI tools are reactive. You prompt, they respond. You close the tab, they stop existing. That’s useful. But it’s not the same as having something working for you all the time.
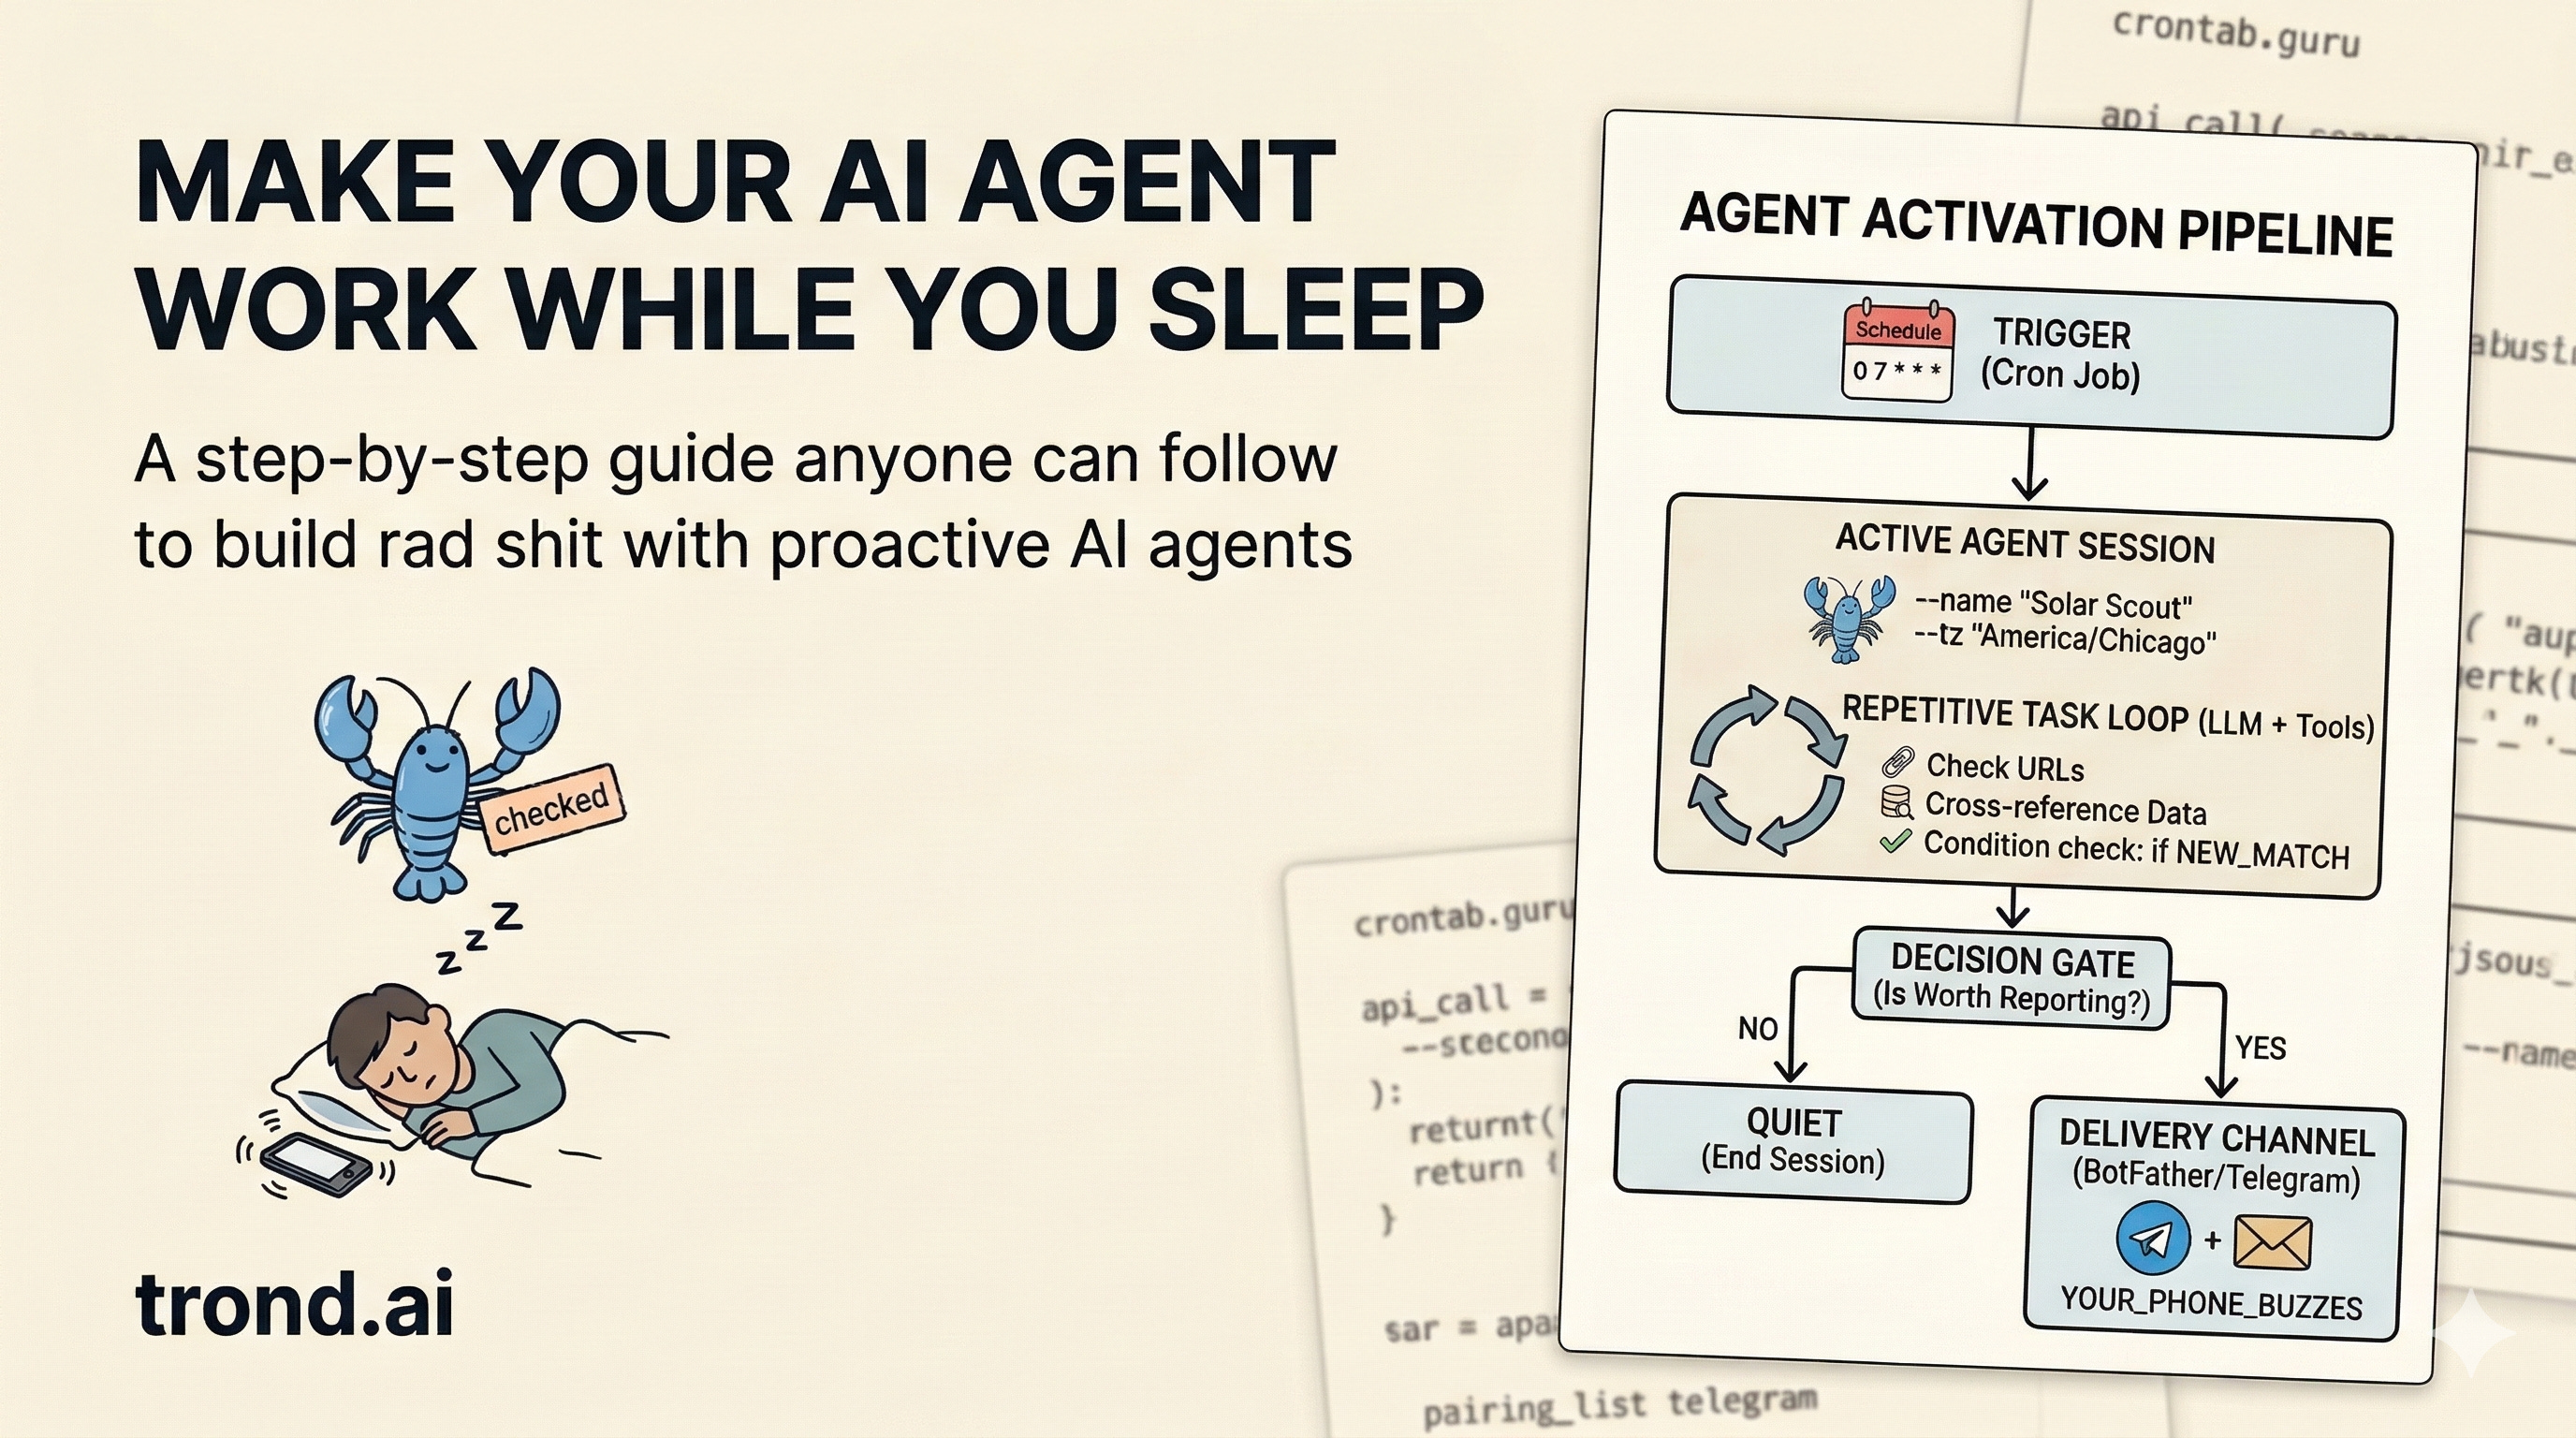
A proactive agent is different in one specific way: it has a schedule. It wakes up, does a job, and reaches out to you if it finds something it needs your input on. If nothing’s worth saying, you hear nothing. You only know it’s running because, every so often, your phone buzzes with something that is worthy of your attention.
The first time that happens something profound clicks.
The good news is that three ingredients are all you need:
A schedule: a system to trigger your agent at regular intervals
A task: a specific job with clear instructions about what to do each time
A way to reach you: configuration for a chat message or an email
Everything else is implementation details.
Introducing OpenClaw
The most popular tool right now for building these sorts of agents is OpenClaw. It’s a self-hosted AI gateway you run on your own machine. It handles the scheduling, the agent sessions, and the channel connections needed to keep an agent running in a loop. It’s become very popular lately because it can be configured to do just about anything and has a rapidly growing ecosystem of skills you can use with it.
It’s not the only option for this, but it’s the one I’ve actually used to build everything I’m about to describe. It runs on Mac, Linux, any VPS, a Raspberry Pi, or even a Docker container you can run on your main computer. Monthly cost beyond the hardware is just your Anthropic, Gemini or OpenAI API usage. For light-to-moderate agent workloads, this can be had for about $5–20 per month.
Let’s help get you started.
Step 1: Install OpenClaw
On a Mac
I have my OpenClaw running an a Mac mini I wasn’t using, so let’s start with this option. If you’ve been trying to buy a Mac mini recently and found them out of stock, OpenClaw is part of why. There’s a wave of people buying them specifically as always-on personal AI servers. The M4 model idles at about 10 watts. Less than a light bulb to keep an agent running around the clock.
If you’re using a Mac for OpenClaw you really want to dedicate that device to your setup so it’s not competing with you for resources. Once you have updates applied and a fresh install, open terminal and run this:
curl -fsSL https://openclaw.ai/install.sh | bashThis one command detects how you system is setup, installs Node if needed, installs OpenClaw, and walks you through the next steps. If you have a Mac ready to go, this is your fastest way to get started.
On a Virtual Private Server
Another popular option is to spin up an inexpensive virtual server (aka a VPS). Hetzner is a good option with their CX22 plan at $4/month. It provides 2 vCPU and 4GB RAM which is plenty for most basic OpenClaw setups. Here’s how set it up:
a. Create the server.
Go to hetzner.com, create an account, and create a new server. Pick Ubuntu 24.04, the CX22 plan, and select a data center near you. When asked about SSH keys, you can skip it and Hetzner will email you a root password — or if you want to set one up, GitHub’s SSH key guide is the clearest I’ve found. It’s worth doing once.
b. Connect to your new server using SSH.
Open terminal and type this:
ssh root@YOUR_SERVER_IPc. Run the installer.
This single command sets up OpenClaw, creates a firewall, configures auto-start on boot, and implements Tailscale for secure remote access:
curl -fsSL https://raw.githubusercontent.com/openclaw/openclaw-ansible/main/install.sh | bashYou don’t need to know what any of that means. The installer walks you through everything, including how to add your LLM API key (Anthropic, Gemini or OpenAI). Once you finish, you’ll have a running OpenClaw gateway.
d. Verify.
After setup, you should check that everything is working as expected. You can do that with these commands:
openclaw doctor    # checks for config issues
openclaw status    # confirms the gateway is running
gateway: running means you’re done with this step and ready to go.
Step 2: Connect Telegram
Telegram is the fastest way to get your agent talking to you. It’s free, works everywhere, has no iMessage dependency, and is the default for a reason. Works on every platform, no phone number required.
2a. Create a bot
Open Telegram and search for @BotFather. Start a chat and run:
/newbotFollow the prompts, pick a name and username for your bot. BotFather will give you a token that looks like:
7412938456:AAHdqTgsH8m9a3Xe5lk0mBHZJzwp1234xxcdCopy that token. You’ll need it in the next step.
2b. Add the token to OpenClaw config
Open your OpenClaw config file (the onboarding wizard tells you where it lives, typically ~/.openclaw/config.json5) and add the following to the file. I’m going to ask you to edit a few text files. If you’re on a mac, you can open the files in TextEdit which is pre-installed. On a VPS you’ll need to use vim which is a bit trickier to learn and somewhat unintuitive. Google it and figure it out. I believe in you.
Anyway, once you figure out how to edit text files add this to the config.json5 file:
{
  channels: {
    telegram: {
      enabled: true,
      botToken: "YOUR_TOKEN_HERE",
      dmPolicy: "pairing",
    },
  },
}
Save the file, then restart the gateway:
openclaw gateway restart2c. Pair your Telegram account
Open Telegram and send any message to your new bot. Then back in your terminal:
openclaw pairing list telegramYou’ll see a pairing code tied to your Telegram user ID. Approve it:
openclaw pairing approve telegram YOUR_CODESend another message to your bot. It should respond. That’s the connection live.
Step 3: Build your first proactive agent
The basic setup is ready. Now for the good part.
A cron job in OpenClaw is just a scheduled task with a natural language prompt. You describe what you want the agent to do, when to do it, and where to send the result. No code.
Here’s the exact setup for a monitoring agent, the same pattern I use for a dozen different tasks:
openclaw cron add \
  --name "My First Monitor" \
  --cron "0 */4 * * *" \
  --tz "America/Chicago" \
  --session isolated \
  --message "Check [URL or data source] for [specific condition]. If you find [thing worth reporting], send me a Telegram message at [your Telegram ID] with the details. If nothing has changed or nothing meets the condition, output QUIET and stop. Do not send any message."
The --cron "0 */4 * * *" runs it every 4 hours. Crontab.guru is a handy tool for building your own expressions. Some common ones:
Every morning at 7am:
"0 7 * * *"Every Monday at 8am:
"0 8 * * 1"Every hour:
"0 * * * *"
The most important part of the prompt: tell the agent to be quiet when nothing is worth reporting. output QUIET and stop prevents notification fatigue. You want to hear from it when something matters, not on a schedule.
For our reader’s solar use case, this might look like:
Check the ComEd hosting capacity map at [URL] for any new high-capacity zones
that weren't in my last report. Cross-reference with parcel data for any lots
over [n] acres within [m] miles of those zones that are listed for sale.
If you find new matches, email me with a summary. If nothing new, output QUIET.
But you don’t need to any of that by hand! You can literally open Telegram and send your bot a message with the prompt above along with a description of when you want it run and how often. And your brand new agent will do it for you. This is the most important lesson here. Your agent knows how to set itself up and can do just about anything you want it to do from now on. This is why we’re careful about the machine we give it access to.
Step 4: The AgentMail upgrade
Telegram works great for personal alerts. But if you want your agent to send proper emails, or receive emails and act on them, you’re going to want to add AgentMail. I like this service because it’s built specifically for agents and how we use them securely. You could give your agent access to your personal email, but before you do that I recommend you really understand what you’re doing so you don’t bork your personal inbox like some people did.
Once you have it setup AgentMail gives your agent its own inbox. Next is setting up your system so your Agent knows about it’s new email account. You can install the skill by hand with this command:
clawdhub install agentmailThen your agent can send from solar-scout@agentmail.to (or whatever you configure), format a proper email report, and drop it in your inbox every Monday morning. It can also receive emails. If you reply to a report, the agent processes your reply and takes action.
For our reader this is the missing piece. Instead of a Telegram ping, he’d wake up to a formatted email from his solar scout with a table of new sites, ranked by proximity to capacity, with links to the parcel listings.
What changes
The first few days you’ll keep checking if it worked. Opening the logs, running openclaw status, making sure the cron fired, etc. Then you forget it’s running.
A week later your phone might buzz. Your agent found something. Something you would have missed because you weren’t looking.
That’s the shift you need to get comfortable with. Your mindset shifts from “What can AI do for me?” to “How do I make my AI work for me when I’m not working?” This is the answer. The initial setup takes 30 minutes. The payoff is an AI that has a job, shows up for it, and only bothers you when it has something worth saying.
Before long you’ll be hooked. You’ll discover you can simply ask your agent to do all sorts of things for you proactively and it’ll set itself up to make it happen. You’ll browse clawhub.ai for skills and eventually write your own skills. You’ll read about how people are doing amazing things with their setups and replicate some of their efforts. It gets fun fast.
On Sunday, my agent texted me at 7am about sold out Harry Potter tickets for a trip we’re taking to London. Stella was keeping an eye out for cancellations, so I could pounce if any came available. We didn’t get the tickets because someone else was faster. That’s a different problem. But I’m hopeful I’ll have another chance.
What would you have your agent do for you?
Builder’s note: The OpenClaw docs are at docs.openclaw.ai and the community is active on Discord if you get stuck. If you end up building something like solar scout, I want to hear about it.
Trond Wuellner builds things at Google Labs and writes about what he learns. If this was useful, forward it to someone who’d appreciate it.